
Smoked baby back rib recipe – Last year I promised a friend that I’d write down the recipe of how I make ribs. So, my first rib cook up this year I was able to get pictures of almost the entire process.
 This rib recipe is my own, it’s not the holy grail for ribs. When I cook ribs they are seasoned well, smoked, able to be held yet come apart with ease. They aren’t ‘falling off the bone’ type ribs.
It should be noted that ribs you get in restaurants are a lot different than the ribs I make. Good ribs take time, it’s a process and below I’m going to share my process along with the seasonings I used in this last batch.
Step 1: Buying Baby Back Ribs
Since we have a Sam’s Club here in Fairlawn Ohio, this is where I purchased everything for making ribs including the ribs themselves. All the seasonings, the smoker, and everything was purchased at our local Sam’s Club. They have some good size, nice looking ribs at Sam’s check them out. They are sold in packs of three full ribs. I like to look for ribs without as much fat, the skinny ribs.
Step 2: Skinning and Trimming the Ribs
When you purchase ribs there’s a membrane on the bottom (bone side) of the rack. I like to remove this membrane. Once you start pulling it away it usually comes off fairly easily. Some racks are harder to remove the membrane than others but I’d recommend cleaning it all off.
Cutting baby back ribs in half – I like to cut my ribs in half for serving portions. It’s preference and doesn’t make much difference in the end product.
Next, I like to trim any extra fat etc. from the ribs. Baby back ribs don’t always come completely trimmed so make sure to trim away any of the excess fat, see images below.

Remember to remove the membrane. This image doesn’t show that but does show cleaning some of the excess fat.

These baby back ribs are trimmed and cleaned, ready for the rub.
Step 3: Seasoning Rub for Baby Back Ribs
There’s all kinds of seasonings and variations of seasoning rubs you can use and experiment with when making dry rubs for your ribs, prior to smoking. Here’s the seasonings I used for these ribs.

Weber Kansas City BBQ Rub, McCormick Grill Mates Applewood Rub, Tones 6 Pepper, McCormick Brown Sugar Bourbon, Weber KC BBQ Rub, and a dash of Kosher salt.
For these ribs I used all the KC BBQ Rub and then added more of the Applewood and Brown Sugar Bourbon than the others. I used a dash of Kosher salt, I’d recommend not using too much of it. Now it’s time to dry rub the baby back ribs.

This is a bowl that I’ve mixed the rub in. Just a dash of Kosher salt or none at all might be best.

Applying the dry rub mixture to the baby back ribs. Coat the entire rib and massage it in.

These are all the ribs ready to wrap.

I like to wrap the ribs in plastic wrap and refrigerate for a couple hours (at least), prior to smoking.
Step 4: Smoking the Baby Back Ribs
I finally purchased a larger smoker from Sam’s Club. I ended up with Masterbuilt X-Large Propane Smoker, and love it. Plenty of room for 9 racks of ribs if you’d like.
First thing I do is start the smoker. I like to get the smoke rolling (follow instructions on smoker) and get the temp to 225 (this is the temp I smoke at). Load the smoker with hickory or applewood. I soak the wood chips in water before adding them to smoker. Seems like they smolder and smoke a little better but it’s all preference.
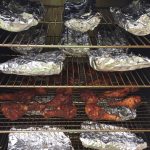
Once it’s up to temp, I load one more batch of chips (as many as you can fit), then load your racks so there’s spacing between each rack and they are altered in the smoker.
-
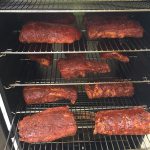
- Baby back ribs, cut in half, loaded into the smoker.
-
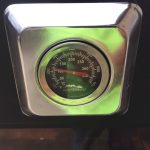
- Temperature to approximately 225
-
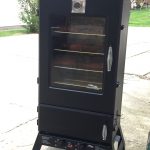
- Masterbuilt XL Propane Smoker
The first 15 minutes of lots of smoke is the most important and will create your smoke ring. Make sure your temp is 225 and held there and the smoke is rolling. Be sure to have plenty of ventilation as too much (sitting) smoke can make your ribs bitter.
Don’t open the door at all during the first hour. After the first hour I rotate the bottom ribs to the top and so forth to get an even cook. I let these ribs do their thing, rotating every hour for approximately 3-4 hours at 225.
After they’ve smoked for a few hours, it’s time to take them out of the smoker, wet rub, then wrap and tin foil and re-add to the smoker.

These ribs are smoked for 3.5 hours and ready for the wet rub.
Step 5: Wet Rub and Tin Foil Wrap for Baking Ribs
The ribs are going to come out of the smoker a little dry and smoked but still fairly tough. In my process I like to take each rib and wet rub with a mixture, then wrap each rib tightly in tinfoil for the final baking process. Ribs will then go back into the smoker for 2-3 hours at 225 degrees.
-

- Mixture of wet rub
-
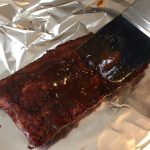
- Wet Rub on Baby Back Ribs applied with Brush
-
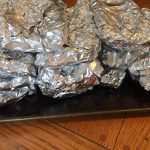
- These ribs are ready to go back in the smoker for the final baking for 2-3 hours at 225.
-
- All ribs back in smoker for 2-3 hours at 225.
Step 6: Grilling the Baby Back Ribs to Finish and Serve
My last and final step is grilling the ribs on an open charcoal or gas grill. Typically if I’m catering or have to par-cook the ribs, I’ll take the tinfoil wrapped ribs and freeze them or refrigerate them, then when everyone is ready to eat, I pull them out, unwrap and toss on grill at low temperature. The grill IMHO is meant to char the ribs.

The final grilling of the ribs before serving.
Once on the grill, you’ll want to add your BBQ sauce of choice. I prefer KC Masterpiece over most others, or you can make your own. Some people don’t want the BBQ sauce on the ribs and that’s OK too. They will be delicious either way.

SPECIAL NOTE: At one point I didn’t have time to smoke, then bake the ribs so I smoked them, put them in refrigerator overnight. Next day I wrapped in tinfoil then baked them but wasn’t ready to serve so I tossed them back in refrigerator, wrapped in foil, overnight again. Then finally I pulled them back out and grilled them. —- These were the very best ribs I ever made. 3 day process.
Step 7: Serve and Enjoy your Baby Back Ribs
That’s it. Your ribs are done. The meat on the ribs should expose the tips of the bones about 1/4 to 1/2 inch. They should be able to be held up yet tender enough to pull off the bone easily.

